-
1 Introduction
-
2 Theoretical concepts
-
3 The printing process
-
4 Arm assembly and electronics
Connecting the components
Things that you are going to need for this lesson:
1 Arduino Mega
- 1 RAMPS 1.4
- 1 Power supply. You can use one from an old computer. If you do that, remember, yellow cable is 12 volts, red cable is 5 volts and black cable is GND. To make the power supply running you will have to connect the green cable from the ATX connector (the big one) with a black cable (GND) before plugging the power supply to the socket.
- 3 POLOLU drivers A4988
- 3 Step motors
- Cables to connect the power supply to the RAMPS.
- Tools
To connect all the electronics you will have to follow these steps:
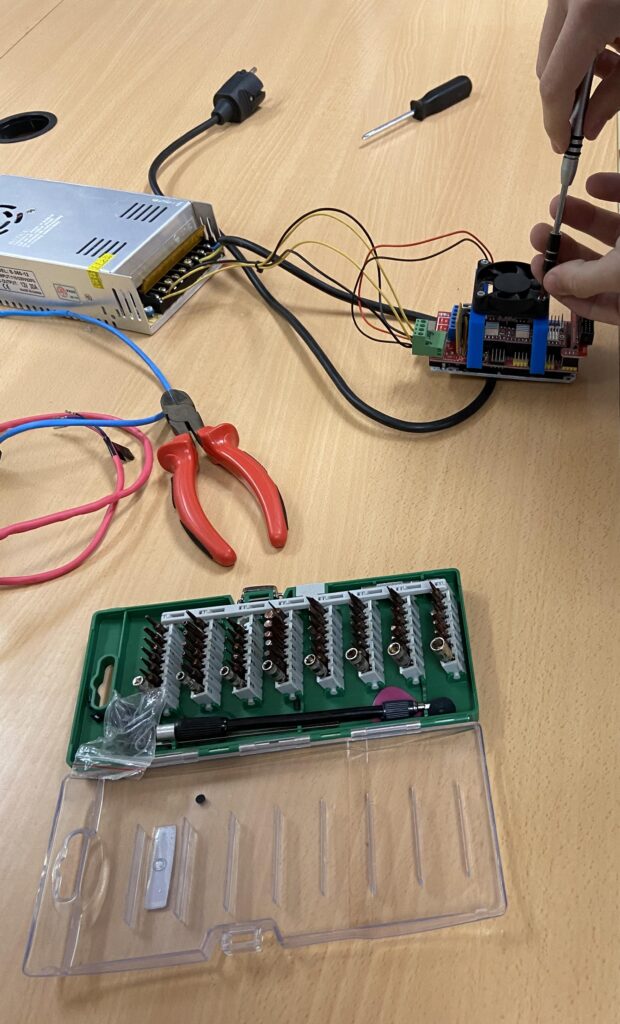
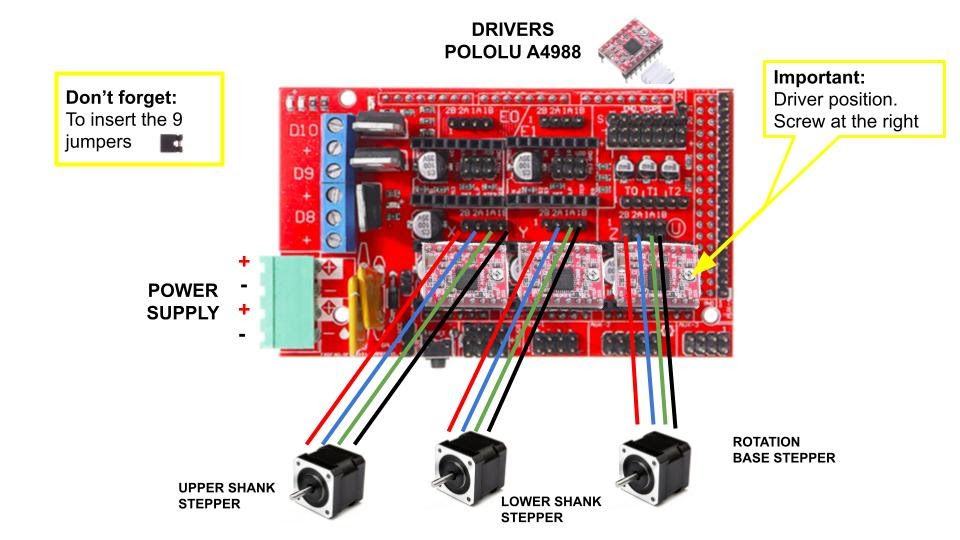
- Connect the A4988 drivers to the RAMPS in the proper position. See the image and the scheme below.
- Connect the RAMPS to the Arduino Mega.
- Connect the step motors to the RAMPS (see the scheme below).
- Connect the power supply to the RAMPS.

Component connection is important in this section. A unpropper configuration can make the robot not work or even ruin the components that we are using.
It is also important to install the firmware and modify those parts of it to adapt it to our needs.

It is important to connect a power supply or battery that provides a voltage of 12 volts and a current of 4 amps.
The fan can be connected directly to the power cables and that way it will always be on. It is important to have the drivers well ventilated as they get very hot and can be damaged if they get too hot.
To control the stepper motors we will need to use A4988 POLOLU drivers which have to be correctly positioned in the RAMPS because otherwise the motor will overheat and surely stop for this reason. Generally the drivers have a small screw to modify the power and that screw should be on the right taking into account the previous diagram.
The RAMPS package comes with 9 jumpers that must be put in the right position if you want to work with microsteps instead of steps. Depending on the configuration used, the microsteps can be a half step, a quarter step, an eighth step or a sixteenth step. If you use a 16th step you can have up to 3200 steps per revolution.
Each step in our motors is 1.8 degrees, so each turn (360 degrees) we will have 200 steps. Using a sixteenth of a step we will have 200 * 16 = 3200 microsteps. That way we will increase the precision of our robotic arm.
